2.1 To start/exit GeoFrame
2.2 To connect to an existing project
2.3 To create a project
2.3.1 Defining the project
2.3.2 Project parameters / projection
2.3.3 Storage settings
2.4 Project backup
2.5 To restore a project
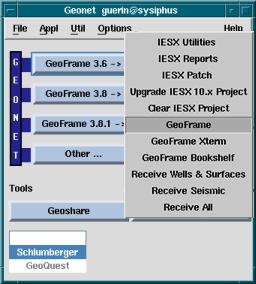
- To start GeoFrame: If the Geonet menu (see next figure) is not present when you log in, type 'geonet' to start the Geonet environment. In earlier setups, (before Leg 196) the Geonet window would appear at login start up, but other unix resources were limited. In the present configuration of the shipboard system (Logger6 and gf_user6 on jason and following upgrades), typing 'geonet' sources the necessary geoframe environment variables while maintaining the full Unix/Solaris resources.
- To exit GeoFrame: try to use the `Exit' button in the windows to exit, rather than the `close' option from the menu from the top left corner of the window. Close modules first, then the Process and Data Manager, and finally Exit from the GeoFrame Application manager window. You don't need to exit from Geonet.
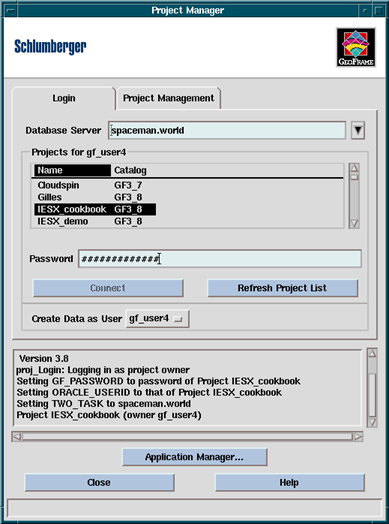
2.2 Starting an existing project
If you want to access an existing project, select it and enter the password (generally identical to the project name, so that you just click the password area with the middle button (MB2)) - then ''Connect', and once connected, select 'Application Manager...'.
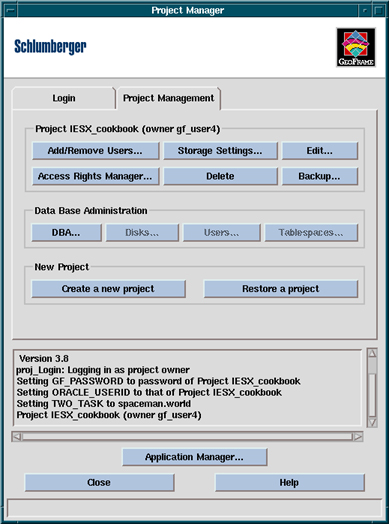
If you want to create a project, press the `Project Management' tab, then `Create a new project'.
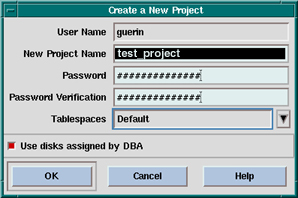
2.3.1 Defining the projectThe 'Create a New Project' window will pop-up asking you the name of the project and a password. For convenience, it is common to use the name of the project as password. After entering the password twice, proceed with 'OK'
2.4 Project Backup
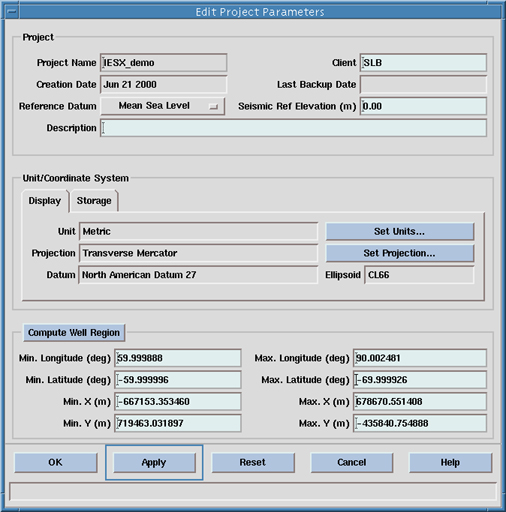
After a few minutes, the 'Edit Project Parameters' window will appear.
2.3.2 Project parameters / projection
The 'Edit Project Parameters' menu allows you to define the general units of the project (basically Metric or English), the projection and coordinate system used to map the seismic lines and the wells, and the location and extent of the project area.
- Press 'Set Units...' to set the Display Units to Metric.
- If you are not going to use IESX in your project, it is not necessary to set the unit/coordinate systems or the well regions, and you can proceed with 'OK'. Otherwise you have to set both storage and display coordinate systems and the well region. In most cases, navigation data are given in geodetic coordinates (long, lat), and the choice of a projection is more a matter of personal taste. However, if the navigation data use any other form of coordinates, it is necessary to use the same reference system as the data.
- Press Set Projection..., then press Create. Choose either the default Datum and Ellipsoid, or one near the survey area. In the case of the Prydz Bay data set, we are using the Transverse Mercator projection, and the default Datum and Ellipsoid. One of the most standard datum is the World Geodetic system 1984, and the most current projection is the Universal Transverse Mercator. When you select this projection, a new window 'select a projection' pops up, where you have to specify the zone and the hemisphere. By selecting a zone and clicking 'apply', the central meridian of the zone appears in the 'create coordinate system' window - so that you can get the closest one. If you choose any other projection , you have also to enter the central Longitude and Latitude of you project.
When setting the parameters in the 'Unit/coordinate system' area, you have to specify the units and the projection for both 'Display' and 'Storage' . For this, hit the 'Storage' toggle once you have set the parameters for the 'display' - the configuration that you have just defined will appear, so that you don't have to re-create it. Just select it. If the parameters are not the same in 'Display' and 'Storage', the wells will not appear on the seismic lines
- Enter the latitude and longitude ranges for the survey area in the 'compute well region' area.
- Proceed with 'OK' to save these parameters - the 'Storage Settings' window will appear.
- If for some reason during the history of the project you need to change these parameters, you can access this editor through the 'Edit...' button in the Project Management window.
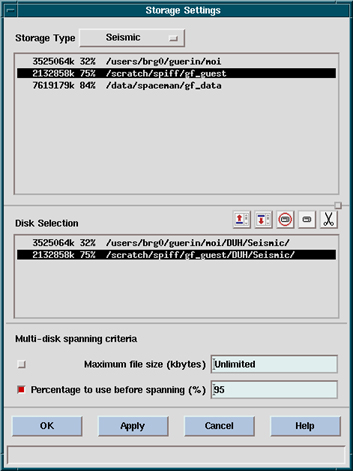
The upper part displays the storage locations available for the 'storage type' selected (use the toggle to select 'Default', 'Seismic', 'Interpretation' or 'Velocity'). These disks should have been predefined by the database administrator. When you select any of the disks in the upper part, it appears in the lower part (Disk selection), showing that it is now selected. If you made a mistake and want to remove any disk from your selection, highlight it an press the scissor icon. It is better to define at least the storage for 'Default' and 'Seismic' to store in different directories seismic data and other data - otherwise, everything will go in the 'Default'.
Unless you have a rather small storage system, it is a good idea to uncheck the box 'Percentage to use before spanning'. This option was originally to prevent filling the system. But with the current configurations and hard drive bigger than 20Gb, it prevents loading when there is still 1Gb left - which is usually enough to handle most projects.The project is now set up - hit the 'Login' tab in the 'Project Manager' window - and proceed to connect (see 2.2).
If you need to change these storages or to add new disk space, you can access this editor through the 'Storage Settings...' button in the Project Management window.
Backing up the project allows you to save an entire project, with all its data, parameters, history and interpretation in a 'self-contained' storage, either on a hard drive or on a tape. This is the most convenient way to safeguard your work, as well as to archive it and to transfer it to an other machine (at the end of a leg ...). To perform the backup, you have to be connected to your project - once connected, select the 'Project Management' tab in the project manager window, and select 'Backup...'
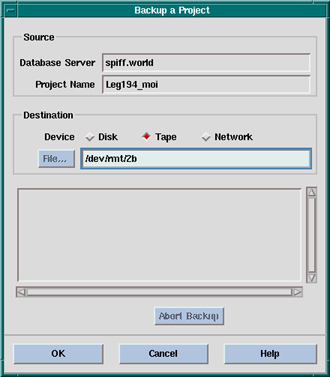
If you want to make your backup on a file, that you could later ftp, select 'Disk' - you will then have to give the file name. If you want to make your backup on a tape (DAT, Hexabyte,...), select Tape. In this case, you have to know the device name for it (/dev/tmt/0,1,2,...). You must first allocate the tape from a terminal window (on brg0, where the DAT drive is the device number 2, the command is 'all cart 2' - on the ship system it is not necessary to allocate it). Then in the 'Backup a project' window you have to give the name of the device (here for brg0 it is /dev/rmt/2b - on the ship it should be /dev/rmt/0b or /dev/rmt/1b). Then 'OK' to proceed. This can take a while for a big project.
To restore a project that has been backed up as described in 2.4, you have to start as if you were creating a new project - i.e. select the 'Project Management' tab - and select 'Restore a project'. The following window will pop-up:
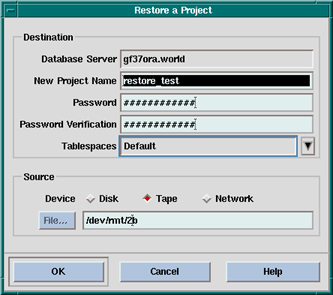
You have to give the name of the project and enter twice the password, just like when creating a new project. The project name does not have to be the name it had before the backup. In selecting the source, if it's the tape, you have to allocate the drive, check its device number (which is not necessarily the same as the one that was used to write the tape), and make sure that you use the same 'behavior option' as when writing the backup. The 'behavior option' is the group of letters at the end of the device name. The 'b' in this example stands for 'Berkeley Software Distribution' (whatever THAT means) - and is required by GeoFrame. Therefore it comes as the default value. Other options include l (for low density) and n (for no rewind), so that a device name could be /dev/rmt/2lbn or /dev/rmt/2l - you have to be aware of this possibility if you are restoring a project that someone else backed up - but if you are restoring a project that you wrote or which was created using the default option you should not worry about that.